Automate GUI Testing With TestNG-Abbot
From NeoWiki
- Easily validate GUI components using fixture objects
Andrew Glover, President, Stelligent Incorporated
27 Feb 2007
- TestNG-Abbot is a testing framework that breathes new life into testing GUI components. This month, Andrew Glover walks you through the hardest part of GUI testing with TestNG-Abbot, which is understanding how a user scenario will play out. Once you've got that down, you'll find it surprisingly easy to isolate GUI components and then verify them using the framework's handy fixture objects.
User interfaces built with Swing, AWT, and the like have traditionally presented a challenge to developer testing because of the following factors:
- The complexity of the underlying graphics framework
- The coupling of presentation and business logic within a GUI
- The lack of intuitive automated testing frameworks
Of course, the first two factors are nothing new -- graphical frameworks are complex by nature and adding business functionality to a GUI application has always posed a barrier to testing. On the other hand, a number of handy frameworks have popped up over the last few years that actually facilitate testing of GUIs.
This month, I introduce a neophyte framework that makes great strides toward easing the pain of testing GUIs.
Contents |
Introducing TestNG-Abbot
TestNG-Abbot is the result of the marriage of two successful developer testing frameworks: Abbot and TestNG. Abbot is a JUnit extension framework specifically intended to enable programmatic isolation of GUI components, and it provides an easy way to validate GUI behavior. For example, you could use it to obtain a reference to a button component, programmatically click it, and then verify the action that followed. Abbot also comes with a script recorder, which you can use to lay out a test scenario in XML format and run it programmatically.
I've written about TestNG quite a bit in this series, so I'll keep my comments here limited. Basically, TestNG is an alternative to JUnit. In addition to all the expected features, it enables a few extra ones. As I have written elsewhere, TestNG is especially well-suited for higher level testing where it can be used to test with dependencies and rerun only failed tests -- in short, the types of tests that come in handy when testing GUIs. (See Resources for more about TestNG.)
With progenitors this impressive, it's no wonder that TestNG-Abbot is such a whiz kid. Like Abbot, TestNG-Abbot enables programmatic isolation of GUI components. At the same time, it uses TestNG's assertions to abstract the details of GUI manipulation into simple fixtures that expose validation methods. Used properly, TestNG-Abbot's intuitive fixture classes make GUI testing almost as easy as stealing candy from a baby. (Not that you would ever want to do that!)
Intuitive fixture classes
The current release of TestNG-Abbot supports seven fixture types, including ones for manipulating buttons, menus, labels, and text-entry components, like text fields. What's more, these fixture types are logically linked to the code under test (that is, the components of the GUI) by name only. This makes for loose coupling between the GUI and its tests, which is beneficial for at least two reasons:
- The tests do not rely on GUI components being specifically located -- thus they can be moved without breaking your tests.
- Tests can be authored early and withstand layout and aesthetic changes during the development phase.
While currently only seven fixture types are supported, others are coming soon. More fixture types will only increase TestNG-Abbot's effectiveness at programmatically validating GUIs.
GUI validation isn't normal!
While TestNG-Abbot makes the process of validating GUIs easier, that doesn't mean it's easy. You have to approach GUI testing differently from unit or component testing. The process of validating business rules within GUIs becomes a process of validating user scenarios; or, to put it differently, GUI testing involves validating visual state changes.
For instance, if a save button on an order entry GUI is pushed, a business rule could stipulate that the contents of the order are persisted to a database. A user scenario, however, might stipulate that a successful status message be inserted below the button -- and that's the particular test you could write with TestNG-Abbot. In fact, if the GUI has been designed well, you can test that the order contents are persisted to a database without testing the GUI. It follows that you could also write these two particular tests simultaneously, and early.
The Word Finder GUI
So that you can see how TestNG-Abbot works, I've created a simple GUI that does one thing -- it looks up a given word in an underlying dictionary (which is a database) and displays its definition. Regardless of how the application is actually coded, testing a user scenario with this GUI involves three steps:
- Enter a word in a text box.
- Click the Find Word button.
- Verify that the definition is present.
Of course, there are edge cases as well, such as if a user presses the Find Word button without having entered a word, or if the user enters an invalid word. I'll show you how to handle those scenarios with a few additional test cases.
- Let's see the GUI ...
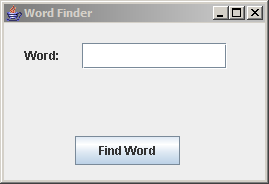
Figure 1 illustrates the Word Finder GUI upon startup. Keep in mind that this GUI is simple for a reason: It demonstrates three of TestNG-Abbot's fixture classes and a few test cases to boot!
When testing with TestNG-Abbot, you should begin by examining a GUI in terms of its parts. The Word Finder GUI is made up of the three components shown in Figure 2:
Figure 2. Components of the Word Finder GUI
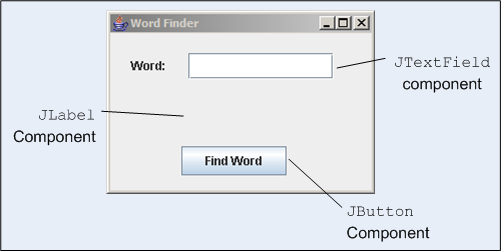
As you can see, the Word Finder GUI consists of a JTextField, where the desired word is typed in; a JButton, which causes the GUI to obtain a definition from the dictionary database; and a JEditorPane, where the actual definition is displayed.
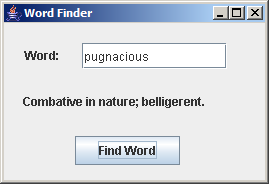
In a sunny-day scenario, if I typed in pugnacious and then clicked the Find Word button, the JEditorPane would display "Combative in nature; belligerent," as shown in Figure 3:
Figure 3. Sunny-day scenario -- everything works!
Testing with TestNG-Abbot
To get started with TestNG-Abbot, you need to create a normal test fixture that creates an instance of your GUI using TestNG's BeforeMethod and AfterMethod annotations. The TestNG-Abbot framework comes with a handy AbbotFixture object that facilitates working with GUI components and essentially bootstraps the entire testing process. To employ this object in a test fixture, you need to pass in an instance of your GUI to the fixture object's showWindow() method before a test and then have the fixture clean things up with the aptly named cleanUp() method.
In Listing 1, I've created a TestNG test (that doesn't actually have any tests in it) that uses TestNG-Abbot's AbbotFixture object in a fixture to hold an instance of my Word Finder GUI.
Listing 1. WordFindGUITest is defined using the AbbotFixture object
public class WordFindGUITest {
  private AbbotFixture fixture;

  @BeforeMethod
  private void initializeGUI() {
    fixture = new AbbotFixture();
    fixture.showWindow(new WordFind(), new Dimension(269, 184));
  }

  @AfterMethod
  public void tearDownGUI() {
    fixture.cleanUp();
  }
}
Because the Word Finder GUI's user-visible behavior affects the three components elaborated in Figure 2, you need to programmatically tweak them to be sure that things work as expected. For example, to verify the sunny-day scenario demonstrated in Figure 3, you would need to do three things:
- Obtain a reference to the JTextField and add some text to it.
- Obtain a handle to the JButton and click it.
- Obtain a reference to the JLabel component and verify that the correct definition is there.
Verifying a sunny-day scenario
With TestNG-Abbot, you can do the three previous steps using three handy fixture types: TextComponentFixture for the JTextField; ButtonFixture for the Find Word button; and LabelFixture to verify specific text within the JLabel.
My code to verify things work as demonstrated in Figure 3 is shown in Listing 2:
Listing 2. Testing a sunny-day scenario
@Test
public void assertDefinitionPresent() {
  TextComponentFixture text1 = new TextComponentFixture(this.fixture,
    "wordValue");
  text1.enterText("pugnacious");

  ButtonFixture bfix = new ButtonFixture(this.fixture, "findWord");
  bfix.click();

  LabelFixture fix = new LabelFixture(this.fixture, "definition");
  fix.shouldHaveThisText("Combative in nature; belligerent.");
}
Note that fixture objects are tied to particular GUI components using a logical name. For example, in the Word Finder GUI, I programmatically tied the JButton object to the "findWord" name. Note how I was able to do this by calling the component's setName() method when the button was defined, as shown in Listing 3:
Listing 3. The Find Word button defined
findWordButton = new JButton();
findWordButton.setBounds(new Rectangle(71, 113, 105, 29));
findWordButton.setText("Find Word");
findWordButton.setName("findWord");
Also note how, in Listing 2, I obtained a reference to the button by passing the "findWord" name to TestNG-Abbot's ButtonFixture object. It's pretty cool how I was able to "click" the button (with a call to the click method) and then use TestNG-Abbot's LabelFixture object to assert the presence of a definition. Not to gloat or anything.
Testing the unexpected
Of course, if I really want to verify my Word Finder GUI, I have to make sure everything works when users do the unexpected -- like pressing the Find Word button before they've entered in a word or worse, if they've entered in an invalid word. For example, if a user leaves the text field blank, the GUI is supposed to display a specific message, as shown in Listing 4:
Figure 4. The dreaded edge case
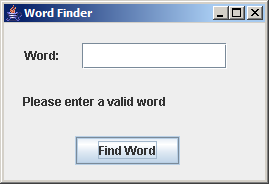
Of course, testing this with TestNG-Abbot should be a cinch, right? All I have to do is pass a blank value into the TextComponentFixture, press the button (via the click method on the ButtonFixture), and assert my handy dandy "Please enter a valid word" response!
Listing 4. Testing an edge case: What if someone presses the button without typing in a word?
@Test
public void assertNoWordPresentInvalidText() {
  TextComponentFixture text1 = new TextComponentFixture(this.fixture,
    "wordValue");
  text1.enterText("");

  ButtonFixture bfix = new ButtonFixture(this.fixture, "findWord");
  bfix.click();

  LabelFixture fix = new LabelFixture(this.fixture, "definition");
  fix.shouldHaveThisText("Please enter a valid word");
}
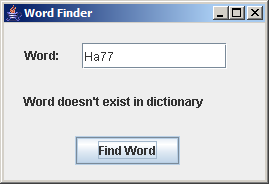
As Listing 4 attests, things aren't so hard once you get the hang of obtaining references to desired GUI components. The last step is verifying the other dreaded edge case, where an invalid word is entered. The procedure for this is quite the same as in Listing 1 and Listing 3: I simply pass the desired String into the TextComponentFixture object, click, and assert the presence of specific text. I've done all this in Listing 5:
Listing 5. Another edge case verified with ease!
@Test
public void assertNoWordPresentInvalidText() {
  TextComponentFixture text1 = new TextComponentFixture(this.fixture,
    "wordValue");
  text1.enterText("Ha77");

  ButtonFixture bfix = new ButtonFixture(this.fixture, "findWord");
  bfix.click();

  LabelFixture fix = new LabelFixture(this.fixture, "definition");
  fix.shouldHaveThisText("Word doesn't exist in dictionary");
}
Listing 5 does a good job of verifying the functionality demonstrated in Figure 5, don't you think?
Figure 5. Invalid word entered
Not bad: I've easily tested three different user scenarios with TestNG-Abbot. All I needed for each case was a logical name for the component under test and a series of steps to create the scenario.
Go forth and test GUIs
TestNG-Abbot may be the new kid on the testing block, but it inherits some very useful features from its progenitors. This article showed you how to use TestNG-Abbot to programmatically isolate GUI components and then use fixtures to expose the components' validation methods. In the process, you've seen how easy it is to test for both sunny-day scenarios -- where everything works as it logically should -- and the less predictable scenarios you can expect once random users are involved. Either way, all you need is to understand a scenario and the components that play a part in the act. Changing component behavior is easy using TestNG-Abbot's handy fixture objects.
Resources
- Learn
- "TestNG makes Java unit testing a breeze" (Filippo Diotalevi, developerWorks, January 2005): Introduces TestNG.
- "In pursuit of code quality: JUnit 4 vs. TestNG" (Andrew Glover, developerWorks, August 2006): Reveals three high-level testing features you'll still find only in TestNG.
- "Getting Started with the Abbot Java GUI Test Framework" (Timothy Wall, Sourceforge): An overview of Abbot.
- "Even easier GUI testing with TestNG-Abbot" (Alex Ruiz's Weblog, February 2007): Alex Ruiz (one of the founders of TestNG-Abbot) gives a sneak peek at what's to come from this project.
- "In pursuit of code quality: Use test categorization for agile builds" (Andrew Glover, developerWorks, October 2006): Discover the three categories of testing you need to ensure end-to-end system soundness.
- "Control your test-environment with DbUnit and Anthill" (Philippe Girolami, developerWorks, April 2004): Find out how to deal with continuous integration, as well as how to use DbUnit with JUnit to control the test environment.
- "Jump into JUnit 4" (Andrew Glover, developerWorks, February 2007): A tutorial introduction to leveraging JUnit's new features enabled by annotations, including parametric tests, exception tests, and timed tests.
- Become a GUI testing cleric with TestNG-Abbot in 4 steps (thediscoblog.com, February 2007): Learn how to set up TestNG-Abbot in four easy steps.
- Testing GUI applications with TestNG (testearly.com, January 2007): For another example of testing a GUI in TestNG-Abbot.
- In pursuit of code quality series (Andrew Glover, developerWorks): Learn more about writing quality-focused code.
- developerWorks Java technology zone: Hundreds of articles about every aspect of Java programming.
- Get products and technologies
- Download TestNG: A testing framework inspired by JUnit and NUnit but introduces some new features that make it more powerful and easier to use.
- Download TestNG-Abbot: This marriage of TestNG and the Abbot framework has made testing GUIs easier than ever!
About the author
Andrew Glover is president of Stelligent Incorporated, which helps companies address software quality with effective developer testing strategies and continuous integration techniques that enable teams to monitor code quality early and often. Check out Andy's blog for a list of his publications.
